
3 Easy Ways to Record Voice on Computer (Microphone)
- Karen Nelson
- May 4, 2023

Download Screen Recorder For FREE!
When you attend online meetings or have a voice chat, you may need to record the audio for further reference. Here, this blog has collected 3 easy but quite helpful ways for recording computer microphone. Now, grasp them and learn how to record voice on computer in high quality via easy steps!
VideoSolo Screen Recorder – Grab Voice in High Quality on Windows and Mac
VideoSolo Screen Recorder, as a top-notch desktop audio recorder in the market, won’t let you down if you have a try.
Although by its name, you will spontaneously regard it exceptionally as a screen recorder, it is actually a multifunctional recorder, including a specially designed Audio Recorder feature for recording audio from microphone and system sound card. You can easily enable both of them or one of them with one click. What’s more, it outputs high-quality audio and it offers multiple output formats for you to choose while recording computer microphone and system sound.
VideoSolo Screen Recorder
- Record audio from browsers, programs, or system.
- Noise cancellation & microphone enhancement feature.
- Auto-stop recording & scheduled recording.
- Built-in editing features to customize your recordings.
- Output your recordings as MP3, WMA, M4A, AAC, FLAC.
Windows 11/10/8/7/Vista/XP/Mac OS X 10.7 or above
How to Record Voice onto Computer with VideoSolo Screen Recorder
As a lightweight audio recorder, VideoSolo Screen Recorder offers pretty intuitive functionality to boost recording computer microphones. Now, go through the brief guide below and grasp how to record audio from computer without hassle:
Step 1. Connect the Microphone and Launch the Audio Recorder
If you need to use an external microphone, plug it into the specific jack on your computer, and make sure the microphone has been activated in your computer.
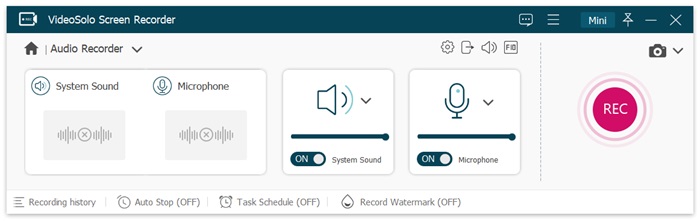
Run the well-installed VideoSolo Screen Recorder on your computer and choose Audio Recorder.

Step 2. Toggle on Microphone & Sound Check
On the panel, you should first toggle on the microphone and move the sliders below to adjust the sound volume. As the software supports recording both internal and external sound simultaneously, you are able to turn on system sound for capturing later if you need. You can do a quick sound check in the settings list to ensure all the sound are well captured.
Tips: You need to install an audio driver before recording audio in Mac version because of some limitations of Mac system. The process can be done in minutes.
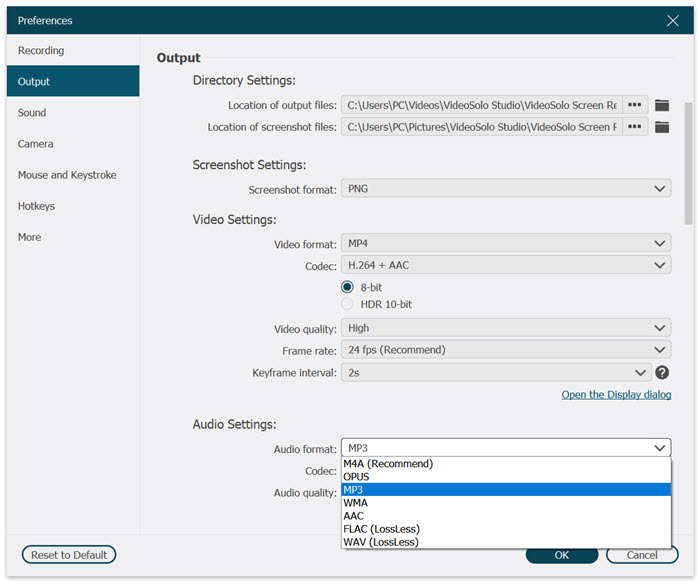
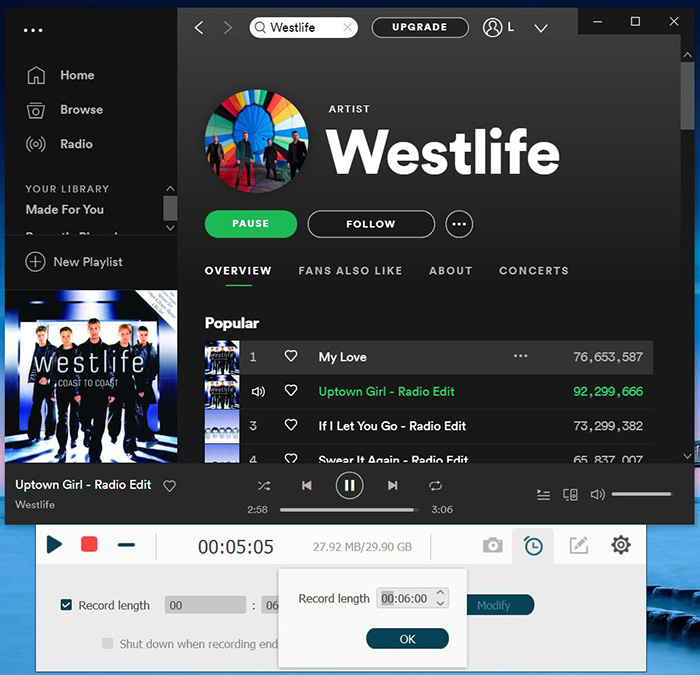
Step 3. Preset Audio Quality and Output
Prior to starting recording voice, you are supposed to make your audio configurations by clicking on the gear-shaped icon. Slide down to the output field where you can choose which audio format (WMA, MP3, M4A, and AAC.) and quality (from “Lowest” to “Lossless”) to your desire. Save your settings by pressing “OK”.
Notice: Mac version has more audio output formats to choose (MP3, M4A, WMA, CAF, FLAC, OGG and OPUS).
Step 4. Initiate Audio Recording and Save It
Once fully prepared, go ahead with “REC” and start speaking and the software will process recording computer microphone for you. When you complete your speech, just press the Stop icon to end recording. Then save it to a specific computer location after preview. Now, you can enjoy your recorded audio file easily on the location where you have placed it.
Windows Built-in Voice Recorder – Record Microphone Sound Quickly
But for some people, standalone audio recorders are not so convenient as a built-in program on Windows to record voice on computers. In this case, you’d better try this Voice Recorder which is bundled with Windows 10. It is convenient and useful at hand. But please note that it can’t record the internal sound on PC at all, but is only compatible with recording computer microphone. The following is the simple way to record voice onto computer with this built-in tool.
How to Record Microphone Audio on Computer with Windows Voice Recorder
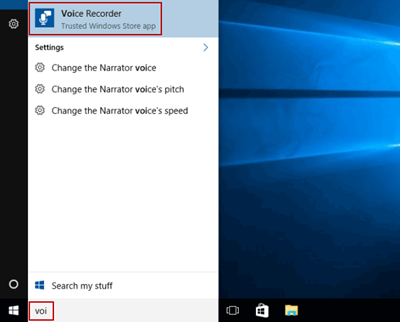
Step 1. Go to "Start > All > Programs > Accessories" and open the "Voice Recorder"
It is very easy to locate it from Windows 10. Just type “Voice Recorder” in the search box on the bottom left corner.
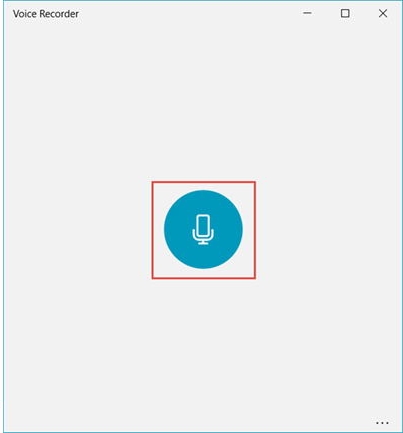
Step 2. Click "Start Recording" button to record microphone sound
It appears a big microphone icon for you to start recording. Go ahead with a click on it and you can start speaking through microphone.
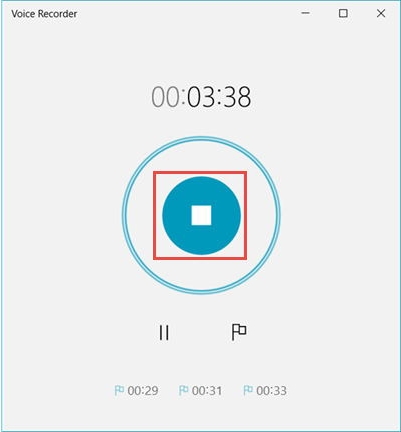
Step 3. Click "Stop Recording" button to stop recording
Under the middle Stop button, there are two small ones. The left is to control pause and resume if you want to have a break during recording, while the right flag-like icon is responsible for adding labels to your recording content so as to help you mark some important places.
Step 4. Save your audio recording
Click the Stop icon in the center of the screen if you have completed. It is automatically saved on the recording list with its birth date and time under it.
It is very quick to record your voice with microphone on Windows with this method. Yet, it is a pity that these recorded files are not as high-quality as those made by professional audio recorders. The output format is M4A and you don’t have choices on the formats. Hence, if you consider more customized output for recording computer microphone, VideoSolo Screen Recorder will be a better choice.
QuickTime – A Simple Way to Record Your Voice on Mac
Like Voice Recorder, QuickTime is also a built-in audio recorder app but it is for Mac. Every Mac holder can try it very conveniently. It is a multimedia technology handling not only audio but also video, animation, music and more. With it, you can quickly record your voice through microphone on Mac. The following is the detailed guide on recording computer microphone on Mac, grasp it below:
How to Record Your Voice on Mac with QuickTime Player
Step 1. Launch QuickTime Player on your Mac
To use QuickTime Player, open the application folder on Mac and search its full name. Click its icon to activate it.
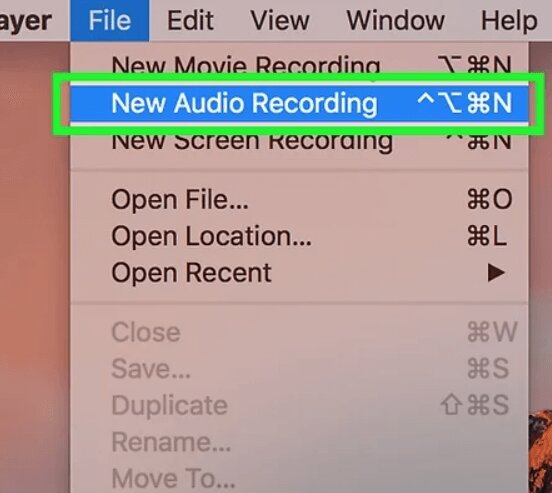
Step 2. Start a new audio recording
Go to “File” > “New Audio Recording” on its intuitive interface.
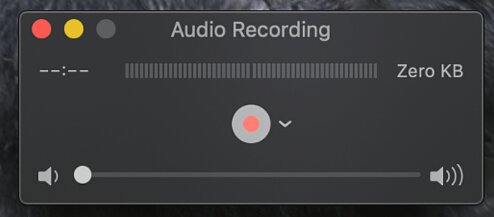
Step 3. Set the sound input and volume
Then, it appears like this. Drop down the down arrow beside the recording button on the center. You can make your selections on sound input (microphone) and quality settings. Drag the slider to adjust the volume on the bottom.
Step 4. Record voice on your Mac
After all is ready, press the red Record button to initiate recording. And finally, click the same button to end recording. Click “File” > “Save” to save it to your hard drive.
However, it’a a pity that QuickTime Player cannot provide high audio quality. If you care more about voice quality and formats, VideoSolo Screen Recorder can be your priority.
FAQs: More Information About Recording Computer Microphone
Still have certain confusion about recording computer microphone? View these frequently-asked-questions to solve it!
Q1: How to record system sound and microphone on computers simultaneously?
A: To record both system sound and microphone at once, your best choice is to use VideoSolo Screen recorder. Here’s a simple guide for you:
Step 1. On the main interface of the software, select “Audio Recorder”.
Step 2. Select turning on both the system sound and microphone to adjust the volume. Then, you are able to tap “REC” and process recording computer microphone with system sound at once.
Step 3. Once the recording ends, tap “Stop” and save the recorded audio on computer right away!
Q2: How to record voice on Windows 10?
A: As introduced in the blog, the simplest way to record voice on Windows 10 is by using the built-in screen recorder. However, this feature only offers a very basic recording feature to help you record audio from computer. If you desire more professional outputs, like freely customizing the audio parameters or editing the recordings before saving them, VideoSolo Screen Recorder will be better for you to select.
Conclusion
The three best ways on recording computer microphone on Windows and Mac are all listed above, I believe you may have your own verdict. The Voice Recorder in Windows cannot give you high-quality and various output. Worse still, you cannot record computer sound. The Mac version cannot provide better quality, either.
Hence, for users who desire a professional recording process and high-quality outputs with customized settings, VideoSolo Screen Recorder can be your priority. As the software is free to get started, you are available to install it today and try without paying a penny!